What do you REALLY need to hike long distances (backpacking)?
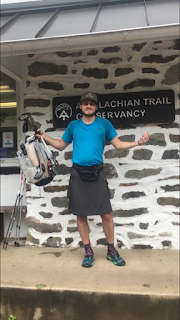 |
| (Harpers Ferry, WVA. AT) My 5 lbs summer hiking kit. Used ~600 miles of trail. |
But what equipment do you need to hike? What skills?
Especially if you've never hiked like this before, the first planning phases of a long-distance hike are like being dropped off in an empty parking lot in the middle of nowhere after being blindfolded on the ride there.
Where to start looking for some answers is the hardest part when you are new, so here are some broad categories to continue your research with:
Water - You can't carry all of your water with you. You need to get it along the way. In order to stay safe and hydrated on trail you should have:
- Containers to carry water inside of with enough space to carry enough water over long distances.
- A way to filter or treat your water to ensure that it is safe to drink.
- A water scoop. A sandwich bag, thin water bottle bottom, or similar that you can use to collect water from tiny and/or shallow water sources.
- SKILL - plan your day (route, direction of travel, breaks, camp spots, lunch spots, etc) around water and its availability.
Clothing - having several layers of clothing that you can use to deal with changes in the weather conditions is extremely important:
 |
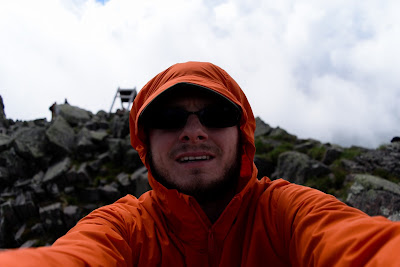
| Above: THIS WAS JULY on the Appalachian Trail. Maine |
- Do Not Underestimate the Weather. EVER. You will get chilly in camp at night or in the rain during the day even in the middle of summer.
- A lightweight rain jacket is the minimum that you should carry to protect your torso from heat loss. A WATERPROOF, hooded rain poncho that covers you, your backpack, and ideally covers down to your knees is even better. If you decide to go for a full 'rain suit' of jacket + pants, make sure that you can wear the waist of the pants high above your hips and the bottom of the jacket overlaps the waist band of the pants.
- You should be able to spend all day outside in your clothing layers (when all used together) without having to move around much, or at all, to get warmed up. If you get injured or are hanging out in camp for a while, you will not be moving enough to stay warm. Test your layers outside in the colder months to get an idea of what you'll need on cold nights.
- You should be able to strip off extra layers as you get hot and put them in your backpack ("pack"). Avoid sweating into anything but your base clothing (also called: 'base-layers' or 'active layers'). My base, for example, is compression underwear, running shorts, a running t-shirt, a pair of merino wool socks (and a pair of toe-sock liners where necessary), and a pair of lightweight, quick drying, sneakers.
- If it is cold you will absolutely need at least a pair of thin gloves to be able to do ANYTHING with your hands. Hands will rapidly experience cold-related pain and lose dexterity (fine task ability) in the cold.
- Baseball Cap / Sunglasses - Protect your eyes. "Transition" prescription eye-glasses are great for being outdoors all day every day.
- SKILL - pay attention to your body and add/remove layers as needed. Ignoring when you are hot or cold, even if just for a little while, can add up and hurt you later.
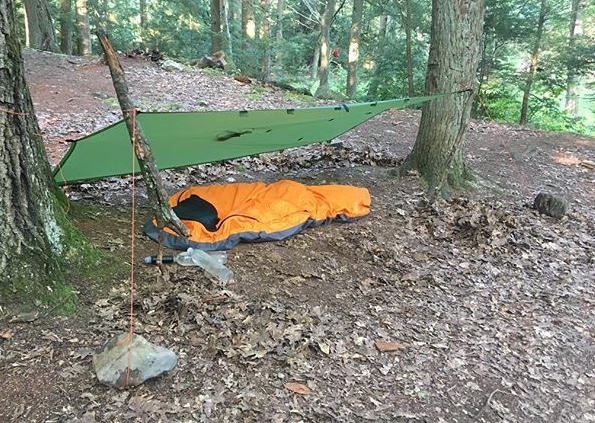
Shelter - You need to be able to put up a shelter of some kind. Do not rely only on 'manmade' shelters available to you on trail. You must be able to use your own shelter system to create a dry, warm, protected space. When you are not moving, your shelter makes it easier for you to stay comfortable and safe.
 |
| This tarp+bivy set me back less than $100. |
- Waterproof top and side covering protection. Rain does not always fall straight down. Where you do not have waterproof sides/ 'walls' to your shelter, you'll need a bigger 'roof' to hide under to stay dry. More side covering protection will often also give you a little more privacy for changing clothes and hanging out in your shelter.
- Waterproof floor sheet ('ground sheet'). This can be as simple as a big piece of plastic. A ground-sheet keeps you from getting wet and/or dirty from the ground.
- Mosquito netting ('bug mesh") - netting that is small enough to block little gnats is an important feature for any shelter. You want to be able to have a place to sleep comfortably and be able to relax when you are awake.
- Room to move around. If your shelter is too small, you won't be able to do anything when you get stuck inside of it during rainy, cold, buggy ('heavy bug pressure'), or otherwise bad conditions. You also need room to change clothes and pack up your equipment when breaking down camp without having to get your gear and clothing wet while doing it.
- SKILL - Know how to use your shelter's features to keep you comfortable BEFORE you go out on trail. Practice setting up your shelter, and spend a couple of nights in the backyard, on the back porch, or at nearby camp spot before you set out on your hike. Being able to set up your shelter in the rain without getting all your gear wet takes practice.
Food Bag - You are going to need calories to keep going. Survival literature often states that 'you can live for three weeks without food', but if you don't have enough food to keep you energized and warm throughout the day you are probably going to have a very uncomfortable trip. Your body is amazing in that it is like a heater that keeps itself at the right temperature, but there are limits to what it can do well without enough food calories to fuel it. Your food bag should always include the following:
- A waterproof sack (or waterproof 'bear-proof' container where required) to hold all contents of 'food bag'.
- A 50 foot length of strong, lightweight cord used to hang the waterproof sack high off the ground and away from nearby tree trunks and branches.
- A spoon.
- Enough food calories for three meals / day (and/or snacks throughout the day) for the number of days you plan to hike + 1 day's worth.
- You do not need to cook anything. I have hiked for months without needing to cook. Most people prefer to be able to have a hot meal, though, and carry a stove, stove fuel, and a cook pot.
- A trash bag. A 'gallon-sized' resealable sandwich bag should hold weeks of your trash at a time with ease. Where your food is packaged in boxes, or otherwise bulky packaging, you should repackage it where you can so that you have less garbage to deal with later. Your trash weighs less than it did when it still had your food in it, there is no excuse to leave your garbage in the woods.
- SKILL - learn Leave No Trace ("LNT") practices and how to "hang a bear bag" to protect your food and keep unwanted visitors (bears/rodents) from stealing and spoiling your food supplies during the night.

Sleep System - When you decide to lay down to go to bed at night, you are going to be laying absolutely still for hours. You are not going to be producing any extra body heat, and if you do not have a sleep system, you will get cold. If you are cold, then you will not get any sleep. Sleepless nights ruin hiking trips. Make sure you have these with you:
 |
| Very comfortable bivy sleeping setup. Sleeping quilt, thick sleeping pad, pillow. |
- Sleeping bag or sleeping quilt. Rated 10-20 degrees Fahrenheit lower than the low temperatures you can expect to have to deal with on trail. Check the weather reports for the days/months that you plan to be on trail. Make sure your kit can handle the worst conditions and coldest temperature the weather report says you can get.
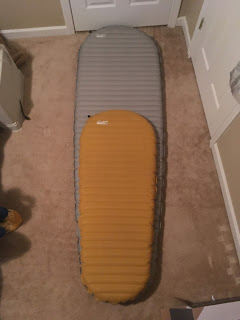
- Sleeping pad. You will lose a ton of body heat to the ground if there's nothing to keep you off of it.
- Beanie Hat (or similar). Your head will usually not be covered (not completely or not at all) by your sleep system.
- You don't need dedicated sleep clothes. This is up to you in the end. If you do not have clean clothes and you are wet and/or your clothes are very dirty you should get into your sleep system naked. When I'm soaked before bed I get naked to keep my sleep system dry, you do what you have to do when it means being safe and comfortable on trail.
- SKILL - Learn to use your clothing layers, backpack, and other equipment to modify and increase the comfort of your sleep system. Almost everything you carry can be used in multiple ways, like using your backpack to keep your feet elevated or to keep chilly toes warmer in cold weather.
Tools - Tools (and the skill necessary to use them) mean capability. Getting around safely, navigating in the dark, staying warm, and just enjoying yourself in the woods often depend on tools. There are a number of tools you should have with you every time you go on trail:
 |
| Tools can mean the difference between just getting by and actually having a good time. |
- A flashlight or 'head lamp' (USB rechargeable recommended). 40 Lumens or greater, longer battery life is better. Estimate a minimum of 4 hours of battery usage per night with an extra night's worth of battery in reserve. Lights with a low "moonlight mode" can allow for incredible battery life.
- A knife. You need a knife on trail, because when you do need it, nothing else will do the job. To cut/modify cordage (light, strong ropes) used with your shelter system, deal with impossible knots, open food packages, and accomplish other critical cutting tasks. Don't go crazy with your knife, but at the very least carry something that locks open securely, has a 2 inch blade, a handle, and a way of keeping it from getting lost - lanyard/pocket clip/sheath/carabiner/carried inside backpack.
- A small lighter. Many of the small, cheap lighters carried by cigarette smokers are extremely reliable.
- Communications Device(s) (USB rechargeable). 'Smart' or not, touch screen or not, a cell phone network is the single most widely used, cheapest, and most widely supported communications device available today. You MUST have a way to get information or help from the outside world. Even if you don't have a smartphone, you can still call a friend or family member from a hilltop and ask about the weather report and discuss travel plans and changes to hiking routes/locations with others.
- Where you don't have cell phone service, consider purchasing a Personal Location Beacon (PLB) of some kind for emergencies. Even if you are a very skilled outdoors-person, getting something that lets you check in with family can help you avoid people getting "worried-sick" and calling out a search party. (Not kidding!).
- On longer trips, carry the means to charge your devices from an outlet. Where you can use the same cable and usb wall plug to charge multiple devices, you'll be able to reduce the weight of your kit and clutter involved with storing it inside your pack.
- A backup battery pack(10,000 mAh or smaller) is often not necessary where you are able to get into town every 3-5 days. I carry one now since I'm always filming for my hiking youtube channel, but I didn't carry a back up battery for most of my hike. I went 12 days, from Katahdin through the 100 Mile Wilderness southbound into Monson, Maine on a single charge for all of my devices with no battery pack. My phone (iphone 6+ at the time) was at 23% battery when I walked into town on the last day after I had taken PLENTY of pictures with it and left it on airplane mode the entire time.
- Map and Compass - on a long, clearly marked hiking trail like the AT, you will probably never need a compass. At the very least, though you should look at the next area that you are going to hike through online before you head out and get an idea of, "if I get lost, what direction will I go?, What is there to look for nearby?" With a basic ability to determine cardinal directions (North, South, East, West) and a little knowledge about what's in the area you can be a heck of a lot safer on trail. If you are going somewhere much more remote, much less hiked than a popular trail like the AT for example, it's a damn good idea to bring a map and compass and know how to use them. Batteries fail, people get lost... things happen. (Research basic navigation online :)
- SKILL - learn how to manage the battery life of your electronic devices. Keep your phone on 'airplane mode' until it is needed instead of turning it on and off frequently. This will use much less battery. When you aren't walking around at night or actively doing something that requires a bright light source to do safely, use the lowest power setting on your flashlight that you can get away with. Turn on airplane mode, and turn off your phone's screen, to charge your phone faster.
Ditty Sack - you are going to have a TON of little stuff to keep track of when you hike. Your phone charger and phone, flashlight, USB wall plug, water treatment tablets (if you use them), gloves, beanie hat, car keys, wallet, and other odds and ends have to go somewhere so they don't get lost in the bottom of your backpack and end up falling out somewhere when you access other equipment.
- A bug head-net "ditty sack" makes an incredible little bag to keep everything in. As an added bonus, when the bugs get really terrible you can use it to keep from going insane from gnats flying up your nose, ears, and into your eyeballs.
- Travel-size toothbrush and toothpaste tube. (Brush your teeth with fluoride toothpaste on trail!)
- Re-sealable sandwich bag (waterproof) with a good supply of toilet paper. Keep it sealed up!
- Glasses cleaning cloth for eye glasses. (Your clothing will stop working as a cleaning cloth as soon as your clothes get sweaty and your glasses will get super scratched up).
A Sit Pad - I used to think that a sit pad was optional.
I went several months without one, thinking that it was 'unnecessary weight'. When I hiked with my hammock through Virginia on the Appalachian Trail I thought "I don't need a sit pad ... I'll just use my hammock". It's silly to go through the effort of setting up a hammock for a 5-10 minute break. I never did it, and I ended up just sitting wherever I could. After a month of this I got really fed up with not having a clean, comfortable place to sit.
I went several months without one, thinking that it was 'unnecessary weight'. When I hiked with my hammock through Virginia on the Appalachian Trail I thought "I don't need a sit pad ... I'll just use my hammock". It's silly to go through the effort of setting up a hammock for a 5-10 minute break. I never did it, and I ended up just sitting wherever I could. After a month of this I got really fed up with not having a clean, comfortable place to sit.
- A closed cell foam (CCF) sit pad that folds up into a small rectangle or tube and can be strapped to the outside of your backpack for easy access and use.
A MEDICAL KIT? - I've complained about medical kits many times in the past. A "Medical Kit" is often a useless, store-bought 'just in case' item that will fail you on trail when you actually need it, not to mention more expensive than it needs to be. Make your own kit! If you bring a "med kit" make sure that you tailor it to your personal needs and only pack things that will actually help you if you really do need a med kit:
 |
| My knee bothered me pretty consistently the last 600mi. Duncannon, PA. |
- Medical tape and (4+) gauze "4x4's" ( I hate bandaids. They fall off, get sweaty and gross, and don't breathe.) If you are actually bleeding or want to keep something clean on trail, 4x4's and medical tape are going to do an infinitely better job. If you are very worried about bleeding, carry a clotting agent like "quick clot" and or a pre-made tourniquet.
- 1-4 cleansing swabs/ towlettes - these can often be used together with your patch kit if you carry an inflatable sleeping pad.
- A very small amount of triple antibiotic ointment (1-2 individual small tear-open packets).
- Personal medications in appropriate containers (as prescribed).
- Where you have a known issue (I messed up my left knee summer 2018 and had to deal with it for 2.5 months, for example) you can carry a dedicated brace or ace bandage / and a good supply of over the counter medication (Naproxen Sodium worked very well for me). Otherwise, 2-3 days worth of an over the counter anti-inflammatory/pain and fever reducer will get you to the next town/road crossing where you can get more or find a clinic.
- Anything you use from your medical kit should be replaced the next time you resupply in town.
- SKILL - take a first aid course, learn to control bleeding, learn to properly make and apply a tourniquet, learn to splint a broken limb and manage/fix dislocations, learn to perform CPR, and carry a means of getting help like a PLB (especially where you are alone). Learn blister prevention and care online (liner toe-socks worn under your hiking socks can really help!).
A Backpack! - I listed the backpack last because it is really something that should be selected to fit your kit! But you have to start somewhere, right?
- If you go to a store and pick out a backpack with the help of an employee you'll probably end up buying a 60-70 liter backpack. JUST RECENTLY, popular stores have started to catch up and start selling packs closer to 40 liters in size.
- Assuming that you are hiking in the main hiking season and aren't doing more than a 10 day (or so) long section of trail at a time (and don't have a large bear canister) 40 liters is a good size backpack to start with.
- Non-waterproof backpacks can be used with a properly-sized 'pack cover' to reduce the amount of water the pack soaks up in the rain, though I think a poncho does a much better job at this.
- If your backpack is not waterproof (most are not), you will need to use a trash compactor bag as a "pack-liner" to make it waterproof inside and/or use a poncho that covers your pack to keep it dry. Where you are crossing streams and/or are exposed to a lot of rain a pack liner is an extremely good idea. You can ball it up and just use it when you need it if you really hate using one.
 |
| 70 Liter Pack starting out (HUGE) |
 |
| Moved down to 40L when my 70L failed 3 weeks in. |
 |
| I've settled on 26L-30L packs unless in very cold temps. Rock-hopping's fun again! |
If you are just starting out hiking and backpacking, make an effort to keep your equipment load-outs as lightweight as possible. You WILL have a better first hiking trip. You don't need to break the bank, you can find "ultralight hiking budget gear lists" all over the internet. Just don't copy someone's list contents exactly since it might not work for you or your trip.
The above should get you started in the right direction.
--------------------------
Regards,
'Songbird Ultralight' - Curt
--------------------------
-----------------------
For these and more hiking/backpacking/outdoor tips you can check out my book (available in print and ebook format on amazon)
If you like these videos, blog posts, and reviews and want more or maybe you've learned something that you didn't know before, and you'd like to support the channel directly you absolutely can do that here.
-----------------------
I am no longer working with the Amazon Associates program. Any links found on my content will no longer support the channel, but they will be left up for accessibility / viewer reference. Thank you for your continued support of my content!
------------------------


Comments
Post a Comment
Hey, I appreciate you taking the time to comment. I hope you have a really good day.