Poncho Tarp and Bivy setup pictures - how I set up my camps
Thank you for supporting the blog by checking out this post. Please note: As an Amazon Associate I earn from qualifying purchases.
Tarp Pitchings I Like To Use
This is just a simple post of a few pictures showing how I set up my poncho tarp on trail. If you want to see a detailed list and explanation of everything I am taking with me on the Appalachian trail in May of 2018, check out my Super Ultralight Gear List Video or Lighterpack Page. If you want to see the poncho tarp I use in more detail, check out my poncho tarp review.A big part of using a tarp is finding a spot where the water would (probably) flow around your camp if it rained instead of running through it. Using a waterproof ground-sheet means that you will be kept nice and dry from the wet ground where it has rained before you had a chance to set up camp. A waterproof bivy sack allows you to be much less worried about flowing ground water coming through your camp, but good site selection is always important to a comfortable night's sleep. Never forget to look up for deadfall branches when you are camping near trees!
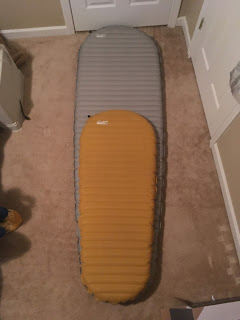
Look for a spot where the ground raises up in a little bit of a mound. If the ground slopes away from your campsite on all sides, then its very unlikely that water will flow under your tarp. Make sure your groundsheet doesn't stick out from underneath your tarp, since this will collect a ton of water and bring it right into your sleeping area. Since I use such a small tarp, I prefer to use a bivy sack instead of a ground sheet to keep my stuff up off the ground. It stops mosquitoes too!
The Lean-To

A "Lean-to" tarp pitch in NY. You can see my orange food bag hanging in the distance.
This was a campsite so nice that we stayed there twice (we decided to "zero-day" in the woods). I don't carry tent-stakes anymore, so I just used sticks and rocks here in combination with my guy-lines to set up a perfect little lean-to.
Other than just pulling it over you like a blanket, the Lean-To is the simplest way to utilize your tarp as a shelter. You can pitch a lean-to without the use of trees, just using a waist-high stick at each of the front corners. Where trees are available and the weather is nice a lean-to pitched like this will give you a little more headroom, letting you sit up underneath your tarp while hanging out in camp.
A lean-to will give you the most square footage of coverage from above, and is a very nicely ventilated tarp pitch that can really cut down on the amount of dew you find on your equipment in the morning.
The Plow-Point

A plow-point tarp setup on Anthony's Nose above the Bear Mountain Bridge in NY. Whistling winds meant that to get a good night sleep I needed a very wind-proof shelter.
The plow-point comes all the way down to the ground on the windward side (the side where the wind is coming from) for ultimate strong wind protection. This tarp pitch looks like a wedge, and you can often tuck the corners on the wedge side underneath, giving you a very protected spot to put gear. If your tarp is large enough, you can even tuck your head end of your sleeping setup into the point of the plow-point.
Crawling into such a tight setup can be a pain but once you are inside you will be grateful for the protected environment. Without a strong pitch, exposure to very windy conditions can keep you from getting a good night's sleep.
The bivy is great to sleep in where there's juuuuust enough space to lay down between obstacles like this and does a great job of protecting my inflatable sleeping pad from all the pointy stuff that wants to murder it on rougher ground!
Cowboy Camping
 |
| Yuck, what a blurry picture! It was a blurry morning. |
Cowboy camping is a surefire way to feel like you are sleeping IN the woods. Some people don't sleep well on trail without feeling enclosed by a tent or some kind of structure. When you wake up there's nothing between you and the world to offer you any kind of feeling of shelter. On a nice summer night, there's nothing better than just sleeping out in the open with a bunch of friends.
Cowboy camping does carry with it a risk of getting damp with dew in the morning. It is surprising how much water can collect on top you in the early morning hours! A bivy will protect you from this moisture, but picking a good campsite with lots of green leafy cover and avoiding cowboy camping on windless, clear nights will help cut down on the morning dew.

The "cave" tarp setup from the lawn of Laughing Heart Hostel in my favorite town, HOTSPRINGS, NC!
This is a super great setup for nasty weather that just can't decide which direction it wants to come from (and if you need to feel a little more closed-in like with using a tent. The cave gives you great protection from three sides, leaving only a small window for wind-blown rain to penetrate its defenses. You can pitch the peak of the doorway lower in really nasty weather to give yourself more protection, using the hood to lift the tarp from the back to preserve living space underneath. In this picture I had it pitched higher for better headroom as I expected good weather. I could have used a simple lean-to here, but the Cave offers an excellent combination of privacy and living space compared to many other tarp pitchings.
I've thought about making a rain skirt that doubles as a "beak" or door for the front of this shelter, but it hasn't been necessary with the waterproof bivy sack. In really bad weather I can use a rain jacket as a door to help close the tarp shelter off more, though I only really carry a dedicated rain jacket in colder weather and prefer the poncho tarp for actual rain protection throughout the day.
The Improvised Lean-To
 |
| Yard setup for demonstration. Poles set high so you can see better. Hood in middle usually tied back too. |
Honestly, basically every time it has rained I've been set up in an improvised lean-to pitching to great effect. Unfortunately, this means that I really don't have any pictures to post. I do have a video of myself talking from under this tarp in the morning after a rainstorm though!
I hope the video helps you get an idea of what the improvised lean-to is all about. I don't have an in-the-field picture of the improvised lean-to to post (bad songbird), but if you look at the cave you can see how the tarp corners are secured straight to the ground with no guy-lines for the front opening. The improvised lean-to is the lean-to with the head end of the shelter secured to the ground like this. Easy! It's my favorite way to set up my poncho tarp. In future pictures and videos I'll be showing more of how and where I set up camp each night.
If the weather gets gross or the wind changes direction and you don't want to fully re-pitch your tarp, you can morph your tarp pitch from an improvised lean-to into the cave pitch in about the same time it will take your buddies to throw up their rain-flys on their tents.
New tarp pitches that I want to try this summer:
The Asymmetrical Holden
 |
| Yard picture for demonstration. Poles set higher than normal to give a better view. I'll probably put my head in the far end when it rains. |
 I'm most excited to make use of this new tarp pitch on trail. Even easier than morphing the improvised lean-to into the cave, and probably offering even more protection in bad weather, is the Asymmetrical Holden. To make the Asymmetrical Holden, you just pull the trekking pole out from the open lean-to side of the improvised lean-to (usually the foot end) and stake it to the ground. Take that trekking pole and use it to lift the poncho hood from the back side of the tarp shelter to give yourself some more room inside. Try to lift the poncho in a way that gives you the most vertical foot room.
If you are interested in learning the Asymmetrical Holden tarp pitch, I learned the pitch from "Papa Hiker" on Youtube.
The A-Frame
 |
| Yard photos for demonstration. |
I've fiddled around a little bit with the pitching of this one, but I also first saw this A-frame variant on youtube. The way I've pitched it here is a little improvised, but the idea is that it is more closed up on one end to give better protection. I want to try out an A-frame pitch just for fun at some point on trail, but one thing I don't really like about it is it uses a lot of cordage and tent stakes to set up. Theoretically, though, an improvised A-frame like this could take a lot of abuse from the wind because of its multiple guy-lines and wedge-like shape.

The Mushroom-Fly
I'm still fiddling around with how I'll pitch it, but the next time I'm expecting an end-of-the-world rain storm I'm going to try the mushroom fly out for the first time. I think I might be able to use the poncho hood to center the pitch on my trekking poles.This bad-weather poncho setup looks like it will offer unparalleled wet weather protection. The idea behind the mushroom fly is that all four sides of the tarp are staked close to the ground, making the tarp look like a mushroom cap. Crawling into this bomb-proof wet weather setup will probably be a pain, but the protection and dry, cozy space will definitely be worth it in the worst weather.
If you are interested in learning the Mushroom Fly tarp pitch, I also learned this pitch from "Papa Hiker" on Youtube.
It can be hard to find new pitches for smaller tarps, but Papa Hiker has so many videos on tarp pitching that there are at least a couple that could work with your tarp. Check his channel out if you are looking for more ideas, it has been a good resource for me in finding obscure pitches.
Poncho Tarp and Bivy Experience - Unlocking base-weights under 5.00 lbs (80 oz).
Switching to a poncho tarp and bivy is one of the main things that has allowed me to get to a base pack weight below 5 pounds.Check out some recent gear changes that helped me get to a "Super Ultralight" summer kit.
If you don't like text gear lists and interactive pie charts, check out "The Gear List You Can Watch!"
If you want a poncho tarp like mine, this specific poncho from Big Agnes is discontinued, but you can find the exact same thing from it's original maker "mytrailco" online. A little bit cheaper option that will also work very well is the poncho tarp from Sea to Summit.
I hope you liked this post, check out the rest of my little blog to see how the AT changed my life and keep up with my final 500 miles on trail at
Thanks for the nice pictures. I used to cowboy camp as a kid - I don't think we ever put up the tarps we brought.
ReplyDeleteYeah haha. Cowboy camping is so much different isn't it? My first camping trip ever we just threw a tarp on the ground and pulled another one up over us. I think we all slept on the ground in a fire lane in the middle of the woods. Thank you for your comment! You're my first commenter I think :)
Deletea
ReplyDeleteThis comment has been removed by the author.
ReplyDeleteHey, I just read your article, it was mesmerizing. So if you are seeking for the best tarpaulin supplier in Singapore then visit Excellence Canvas and Trading store to purchase the best quality products at the very affordable price.
ReplyDeletethis is great man tkank you
ReplyDeleteMyTrailCo is out of business (again, as they were GoLite 2.0) but it looks like Sea to Summit has a version.
ReplyDeleteOn the off chance that you can just get to your camping spot by climbing there, you can just take the supreme fundamentals.
ReplyDeletewilderness programs for troubled teens
It's first-class to recognize that the work that got carried out became necessary, reasonable, and finished with a high-quality degree of professionalism. more privacy
ReplyDeleteThey offer great communication, cooperation, and swift work at affordable rates. marketing and branding companies
ReplyDeleteThese tips may help me in the future about Tarps for Sale Near Me | Thetarpswholesaler.com
ReplyDeleteAdmiring the time and effort you put into your website and in depth information you offer. It’s good to come across a blog every once in a while that isn’t the same out of date rehashed material. Great read! I’ve saved your site and I’m including your RSS feeds to my Google account. 마사지
ReplyDeleteMy spouse and I absolutely love your blog and find a lot of your post’s to be just what I’m looking for. Do you offer guest writers to write content for you? I wouldn’t mind writing a post or elaborating on a number of the subjects you write related to here. Again, awesome blog! visit my site ex girlfriends 셔츠룸
ReplyDeleteYou completed several nice points there. I did a search on the subject and found a good number of persons will consent with your blog. 강남가라오케
ReplyDeleteAs a Newbie, I am continuously browsing online for articles that can benefit me. Thank you apply from EasyFinance i need 1000 dollars today
ReplyDelete