Forgotten Grams - the things I've found hikers most often forget to include in gear lists.
Thank you for supporting the blog by checking out this post. Please note: As an Amazon Associate I earn from qualifying purchases.
But browsing shakedown requests and gear-lists online, it's often just as much what's missing from the list as it is what's extra in the list. For the most part people know that they need or want to bring these items with them on a hike, but each of these items can be easy to forget to include in a gear-list (or even to forget to bring altogether). These little things add up, and often amount to a significant additional volume and weight.
A lot of people just start out carrying 550 parachute cord since it is often fairly cheap, though there are some new, more expensive, parachute cord companies that are putting extra survival equipment into their cordage. It's pretty neat if you are interested in survival gear. I've really liked using lighter and thinner options like Lawson Equipment's "Glo-Wire", which I've also ended up using for my tarp guy-lines as well.
One of the lightest and most popular bear cable options used among the most weight-conscious hikers is called 'zing-it' or 'lash-it'. This stuff is crazy strong for its weight, and should last you a long time.
Whatever you choose to use as your bear-cable, make sure you carry about 50 feet (15.24 meters). Shorter lengths of cord will often not be sufficient to reach good branches. A cord that holds knots well and doesn't hurt to pull with your bare hands is always a good choice. With thinner cordage you can always wrap the free end of your line around a stick and use that to pull a heavy food bag up off of the ground, just be careful to avoid hurting your fingers.
There's not much that can ruin a nice campsite like a bunch of trash floating around along the ground right where you are trying to enjoy your surroundings. The worst thing about it is that it's 100% pure laziness on the part of anyone who leaves their trash in the woods.
I use a large zip-lock bag (freezer bags are best) as my trash bags. I start out with a bag from home, and when the bag starts to get beat up I pick up another from a hiker-box or resupply point along the trail.
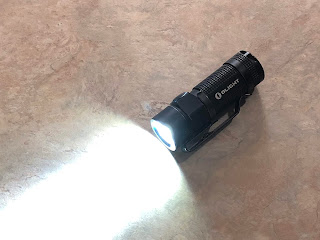
My favorite light for the trail is easily rechargeable at resupply points, and I always keep it topped off with a full charge when I find a power outlet, so I've grown very comfortable hiking without extra batteries. Even if you do carry a set of backup batteries, it can be a good idea to carry a backup light source. Were my flashlight to fail, I at least have a backup light built into my cellphone.
A small battery bank (aka: "power brick") can offer a lot of power security for your electronic devices, which is especially important where you rely on a GPS or smartphone-app guide book instead of a hard copy guide book to keep track of your progress and plan your daily routes on trail. Where you choose not to carry a backup battery of any kind, which I have done many times without issue, the name of the game will be power conservation. You probably already have a battery bank to keep your phone charged on longer days away from home or when you are traveling. I have personally found chargers larger than 10,000 mAh to be too bulky to carry and take too long to recharge.
Make use of "airplane mode" on cellphones and lower screen brightness settings on your device in order to get the most battery life out of your electronics. Turning your smartphone on and off frequently will use up much more power than just leaving it alone on airplane mode. I've gotten 10+ days of battery life out of an iPhone 6 Plus just by leaving it on airplane mode and only taking it out to make voice recordings and snap a few pictures. Check out the "Standby Time" specs for your devices to see how they might hold up on airplane mode, but remember that with older batteries you may see a reduction in performance.
On a longer hike, it can be really handy to have a wall charging plug with multiple USB ports. A two port USB charger seems to be the best compromise between weight and functionality. Where a bunch of other hikers are trying to charge their electronics at the same time, the ability to 'split a plug' with someone else can get you a spot on a busy power outlet. Definitely write your name in an obvious spot on your charging plug, since a lot of them look similar. Where you have multiple rechargeable devices, it is great to be able to charge multiple devices at once. This can save you a lot of time sitting by an outlet in trail towns.
Unfortunately?
In an effort to go lighter, a lot of hikers have opted to make do without headphones. But this does not mean that they make do without music or other sound getting played from their devices. In talking with other hikers, one of the most common pet-peeves I've heard of is having to listen to other people's music playing from external speakers.
Just like if you were in a public place or in quiet coffee shop, bring along a pair of headphones so that your noise doesn't disturb those around you. I would stick with wired earbud headphones where possible, as they tend to be inexpensive, do not require batteries, and tend to be fairly durable.
For most of the day, though, many hikers are going to be on the move. New hikers are often surprised to discover just how quickly they get hot when underway throughout the day despite colder weather conditions. All this supposedly 'worn weight' ends up right back inside the backpack, and these hikers can end up carrying heavier loads, or having less space inside their pack, than they anticipated before setting out from the trail head.
Also, note that worn and carried equipment, the shoes, clothes you are wearing every day, and your trekking poles (your true 'worn weight category') are interesting. List what you're wearing and carrying all day and why. Your complete equipment list can be very helpful to other people that want to make the same trip, and you can save your gear list for later to remember how you packed and see what you'll need for your next trip. It can be especially handy to check your new gear-lists against the old for new trips so that you don't forget essential items.
Again, including little items like a key fob is important. All these little items add up and take up space in your pack. Furthermore, if you account for little items like this in your equipment list, it can make it easier to plan to protect them on trail. For example, where your car makes use of an electronic key fob, it can be important to keep it dry and dust-free. A small zip-lock bag offers excellent protection for sensitive items like these.
Yes, your tent probably makes use of a waterproof 'bathtub floor' that will keep you and your equipment dry in some of the worst conditions. How durable, though, is that material? Over time you will wear through that fabric in places, and you are going to have to repair the damage to the fabric or replace part of the tent.
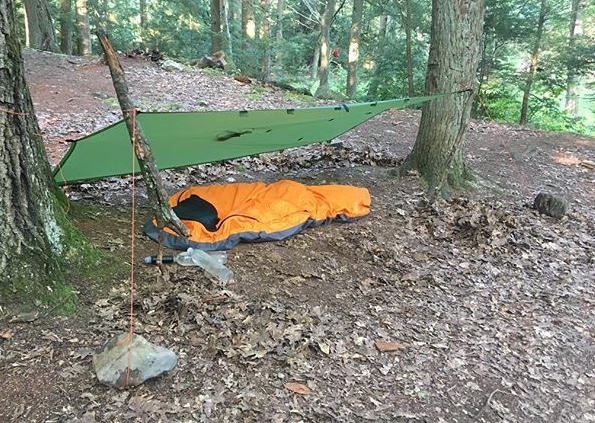
Why not avoid as much damage as possible in the first place? You don't have to buy the tent footprint that the company making your tent sells, though it often will work really well in cases where the tent becomes a free-standing tent or can be set up "rainfly first" in bad weather. One of the most common materials used to make your own tent footprint is Tyvek. You can buy big sheets of the stuff online and cut it to fit your tent's bottom. Make sure that your footprint doesn't extend out too far from underneath your tent's bathtub floor, or it could end up making water pool under your tent during a rainstorm. Even with a waterproof tent floor, you can still get water soaking through where you lay on top of it all night.
You can use sticks as tent stakes, but many tents use several stake-out points which could make finding good stake-sticks a pain. Furthermore, good tent stakes are often specially shaped to stick and stay in the soil much more effectively than a simple round stick 'peg'. The weight of
Guy-lines have to be strong enough to withstand strong winds and frequent tying, but you can get some seriously lightweight, strong cordage online. My favorite guy-line material is the glo-wire I mentioned in the bear-cable (1.) section, but you also could use zing-it type cordage (especially where you make use of pre-tied loops at the ends of your guy-lines for easy setup).
Most notable in terms of additional weight are the steel containers that canister-stoves use for fuel. Most long-distance hikers I've met will carry two smaller fuel canisters with them at any given time to ensure that they don't suddenly run out. (You can't see how much fuel is left inside of the steel containers.)
Small fuel canisters can weigh as much as 94 grams (3.32 ounces) each. Alcohol fuel bottles, which do obviously display their remaining contents, are by comparison usually much lighter.
As a side note, it can be best to avoid purchasing stove fuel online, as the prices will often be much higher due to shipping regulations. Buy at a brick and mortar store for the best prices on stove fuel.
Forgotten Grams
There's little more I enjoy on trail than a good backpack shakedown on a zero day at a hostel. It's a lot of fun to go through all the random extra stuff (at someone's request!) that people bring along in their packs to help them cut down the weight of their kit.But browsing shakedown requests and gear-lists online, it's often just as much what's missing from the list as it is what's extra in the list. For the most part people know that they need or want to bring these items with them on a hike, but each of these items can be easy to forget to include in a gear-list (or even to forget to bring altogether). These little things add up, and often amount to a significant additional volume and weight.
So let's get into it, what are the most commonly forgotten items?
1. Food bag bear-hanging line.
The most forgotten item by far on the gear lists and shake down requests I've seen online is, what I call, a "Bear Cable". Using a bear cable and hanging your food bag properly (or using a bear-canister where necessary) prevents or reduces negative interactions with wildlife, protecting both hikers and wild animals.A lot of people just start out carrying 550 parachute cord since it is often fairly cheap, though there are some new, more expensive, parachute cord companies that are putting extra survival equipment into their cordage. It's pretty neat if you are interested in survival gear. I've really liked using lighter and thinner options like Lawson Equipment's "Glo-Wire", which I've also ended up using for my tarp guy-lines as well.
One of the lightest and most popular bear cable options used among the most weight-conscious hikers is called 'zing-it' or 'lash-it'. This stuff is crazy strong for its weight, and should last you a long time.
Whatever you choose to use as your bear-cable, make sure you carry about 50 feet (15.24 meters). Shorter lengths of cord will often not be sufficient to reach good branches. A cord that holds knots well and doesn't hurt to pull with your bare hands is always a good choice. With thinner cordage you can always wrap the free end of your line around a stick and use that to pull a heavy food bag up off of the ground, just be careful to avoid hurting your fingers.
2. Trash bags.
Another often forgotten item is a resealable trash bag. It's important to have a resealable trash bag that can lock in the smell of dirty foil tuna packets and empty spam packages. Having a designated container to put your trash in makes it much less likely to end up somewhere in the woods. It's important to carry back out to town everything you bring in with you in your backpack. Trash, particularly food packaging trash, ways WAY LESS after you make use of its contents.There's not much that can ruin a nice campsite like a bunch of trash floating around along the ground right where you are trying to enjoy your surroundings. The worst thing about it is that it's 100% pure laziness on the part of anyone who leaves their trash in the woods.
I use a large zip-lock bag (freezer bags are best) as my trash bags. I start out with a bag from home, and when the bag starts to get beat up I pick up another from a hiker-box or resupply point along the trail.
3. Extra batteries for lights/devices.
This one can be fairly situational, but most hikers are going to want to carry an external power source, or at least a set of back up batteries of some kind for their main light source (headlamp/flashlight) on trail.My favorite light for the trail is easily rechargeable at resupply points, and I always keep it topped off with a full charge when I find a power outlet, so I've grown very comfortable hiking without extra batteries. Even if you do carry a set of backup batteries, it can be a good idea to carry a backup light source. Were my flashlight to fail, I at least have a backup light built into my cellphone.
A small battery bank (aka: "power brick") can offer a lot of power security for your electronic devices, which is especially important where you rely on a GPS or smartphone-app guide book instead of a hard copy guide book to keep track of your progress and plan your daily routes on trail. Where you choose not to carry a backup battery of any kind, which I have done many times without issue, the name of the game will be power conservation. You probably already have a battery bank to keep your phone charged on longer days away from home or when you are traveling. I have personally found chargers larger than 10,000 mAh to be too bulky to carry and take too long to recharge.
Make use of "airplane mode" on cellphones and lower screen brightness settings on your device in order to get the most battery life out of your electronics. Turning your smartphone on and off frequently will use up much more power than just leaving it alone on airplane mode. I've gotten 10+ days of battery life out of an iPhone 6 Plus just by leaving it on airplane mode and only taking it out to make voice recordings and snap a few pictures. Check out the "Standby Time" specs for your devices to see how they might hold up on airplane mode, but remember that with older batteries you may see a reduction in performance.
4. Cellphones, chargers, and other electronics.
That brings us to cellphones and chargers. Most modern hikers wouldn't dream of leaving their cellphone behind at the trail head, but since it isn't really though of as "hiking equipment" it is easy to forget to put on your gear-list. Make sure you have a water proof and dust proof phone case of some kind. I have seen many cellphones 'die' on the Appalachian Trail due to constant exposure to humidity and dust.On a longer hike, it can be really handy to have a wall charging plug with multiple USB ports. A two port USB charger seems to be the best compromise between weight and functionality. Where a bunch of other hikers are trying to charge their electronics at the same time, the ability to 'split a plug' with someone else can get you a spot on a busy power outlet. Definitely write your name in an obvious spot on your charging plug, since a lot of them look similar. Where you have multiple rechargeable devices, it is great to be able to charge multiple devices at once. This can save you a lot of time sitting by an outlet in trail towns.
5. Headphones (Earbuds)
With all the electronic devices hikers carry, you'd think that everyone would be carrying a pair of headphones with them in their hiking kit. Unfortunately this isn't always the case.Unfortunately?
In an effort to go lighter, a lot of hikers have opted to make do without headphones. But this does not mean that they make do without music or other sound getting played from their devices. In talking with other hikers, one of the most common pet-peeves I've heard of is having to listen to other people's music playing from external speakers.
Just like if you were in a public place or in quiet coffee shop, bring along a pair of headphones so that your noise doesn't disturb those around you. I would stick with wired earbud headphones where possible, as they tend to be inexpensive, do not require batteries, and tend to be fairly durable.
6. Warm hats, extra clothing, and other items that hikers think will be "worn weight"
Many hikers think that they will be wearing that extra jacket, or that warm hat, the entire time that they are out on trail. "After all, it's in the 40's this time of year."For most of the day, though, many hikers are going to be on the move. New hikers are often surprised to discover just how quickly they get hot when underway throughout the day despite colder weather conditions. All this supposedly 'worn weight' ends up right back inside the backpack, and these hikers can end up carrying heavier loads, or having less space inside their pack, than they anticipated before setting out from the trail head.
Also, note that worn and carried equipment, the shoes, clothes you are wearing every day, and your trekking poles (your true 'worn weight category') are interesting. List what you're wearing and carrying all day and why. Your complete equipment list can be very helpful to other people that want to make the same trip, and you can save your gear list for later to remember how you packed and see what you'll need for your next trip. It can be especially handy to check your new gear-lists against the old for new trips so that you don't forget essential items.
7. Other Everyday Carry Items (car keys, wallet, etc.)
If there is something that you carry every day, it can be easy to forget to include the weight of that item on a hiking equipment list. Like cellphones and other electronics, it can be easy to forget these items because they just don't stand out as "hiking equipment". For those on shorter hiking trips where a car is used to get into and out of the trailhead area, a set of keys probably isn't going to get left hidden on top of one of their tires.Again, including little items like a key fob is important. All these little items add up and take up space in your pack. Furthermore, if you account for little items like this in your equipment list, it can make it easier to plan to protect them on trail. For example, where your car makes use of an electronic key fob, it can be important to keep it dry and dust-free. A small zip-lock bag offers excellent protection for sensitive items like these.
8. Toiletries
Toothbrush and toothpaste are the only toiletry items that I think are truly critical. Especially on a longer hike, you really have to focus on taking care of your teeth. Many gear-lists don't include a simple toothbrush and toothpaste tube.9. Tent Footprints (aka: Groundsheet)
"It's a scam, Songbird! The bottom of my tent is already waterproof!"Yes, your tent probably makes use of a waterproof 'bathtub floor' that will keep you and your equipment dry in some of the worst conditions. How durable, though, is that material? Over time you will wear through that fabric in places, and you are going to have to repair the damage to the fabric or replace part of the tent.
Why not avoid as much damage as possible in the first place? You don't have to buy the tent footprint that the company making your tent sells, though it often will work really well in cases where the tent becomes a free-standing tent or can be set up "rainfly first" in bad weather. One of the most common materials used to make your own tent footprint is Tyvek. You can buy big sheets of the stuff online and cut it to fit your tent's bottom. Make sure that your footprint doesn't extend out too far from underneath your tent's bathtub floor, or it could end up making water pool under your tent during a rainstorm. Even with a waterproof tent floor, you can still get water soaking through where you lay on top of it all night.
10. Guy-lines and Tent-stakes (for setting up shelters)
The weights of guy-lines and tent-stakes are sometimes not included in the listed weights of shelters. Even if they are, it can often be very beneficial to get better-performing stakes and cordage (for guy-lines). If you carry a tent it's probably a really good idea to carry some good tent stakes.You can use sticks as tent stakes, but many tents use several stake-out points which could make finding good stake-sticks a pain. Furthermore, good tent stakes are often specially shaped to stick and stay in the soil much more effectively than a simple round stick 'peg'. The weight of
Guy-lines have to be strong enough to withstand strong winds and frequent tying, but you can get some seriously lightweight, strong cordage online. My favorite guy-line material is the glo-wire I mentioned in the bear-cable (1.) section, but you also could use zing-it type cordage (especially where you make use of pre-tied loops at the ends of your guy-lines for easy setup).
11. Cook Stove Accessories
Windscreens, to improve performance of any cookstove in harsh conditions, fuel containers for alcohol stove fuel, and the weight of the steel canister-stove fuel canisters are all often overlooked items in gear lists.Most notable in terms of additional weight are the steel containers that canister-stoves use for fuel. Most long-distance hikers I've met will carry two smaller fuel canisters with them at any given time to ensure that they don't suddenly run out. (You can't see how much fuel is left inside of the steel containers.)
Small fuel canisters can weigh as much as 94 grams (3.32 ounces) each. Alcohol fuel bottles, which do obviously display their remaining contents, are by comparison usually much lighter.
As a side note, it can be best to avoid purchasing stove fuel online, as the prices will often be much higher due to shipping regulations. Buy at a brick and mortar store for the best prices on stove fuel.
In summation,
All these forgotten items can add up to some considerable weight. That matters because it can give you a bad impression of the weight that you will be carrying in your backpack on your hiking trip, which can be detrimental to your enjoyment and safety.
Furthermore, failing to account for items like these can mean that you'll have less room in your backpack than you thought you would, making it hard to carry everything else in your kit.
There's definitely more that could be listed here, but these are the most commonly forgotten items in the gear lists and shakedown requests I've seen.
If you haven't checked it out yet, and want an easy way to create and save gear-lists of your own, see how you like lighterpack. It's a website that makes all this much easier and gives you a graphic (pie chart) that shows your weight distribution/allocation. Super nifty if you're a gear-head.
Can you think of any other important items that you notice are frequently missing from hiker's gear-lists?
Comments
Post a Comment
Hey, I appreciate you taking the time to comment. I hope you have a really good day.